Using my Gelli Prints

While creating the gelli prints is good fun, and slightly addictive, I knew that I needed to actually use them or otherwise you’d find me under several reams of them, and before long I’d probably need rescuing! The last class on the course was all about turning these wondrous prints into even more wondrous hand crafted items, and I left with quite a bundle of handmade items, some of which I probably wouldn’t have thought of or tried at home:

Using the gelli prints on (clockwise) a handmade notebook, a card and two bookmarks

A HANDMADE NOTEBOOK, A CARD AND TWO BOOKMARKS - THE GELLI PRINT WAY!

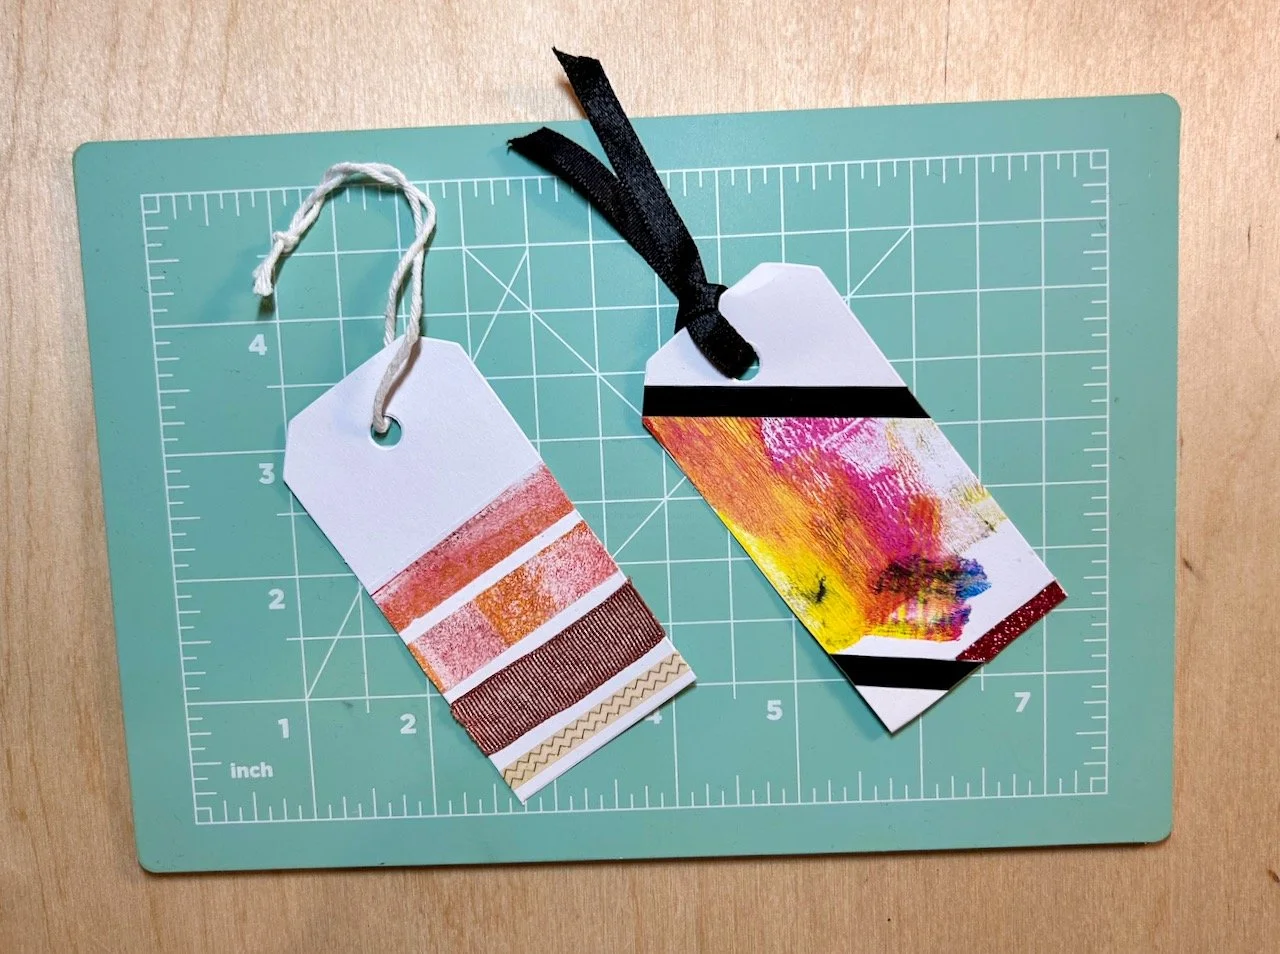
Though I was rather pleased with them, and I’m already using the bookmark with the orange tag in my book - and in case you’re wondering the orange tag is repurposed from a Superdry tag. I can definitely see that I’ll be using scraps of gelli printing alongside many other items I’ve saved for crafting - and I’m already wondering how small is too small for saving these scraps!

But anyway, inspired by the series of four classes I took in Newark and knowing that if I just put this to one side it would probably stay there for a while, I wanted to set about creating some more cards. I’d already toyed with strips of gelli printing and liked that so wanted to try blocks as backgrounds, with a design on top.

SIX pink/peach gelli print blocks with a gold and black floral design over the top on a white background

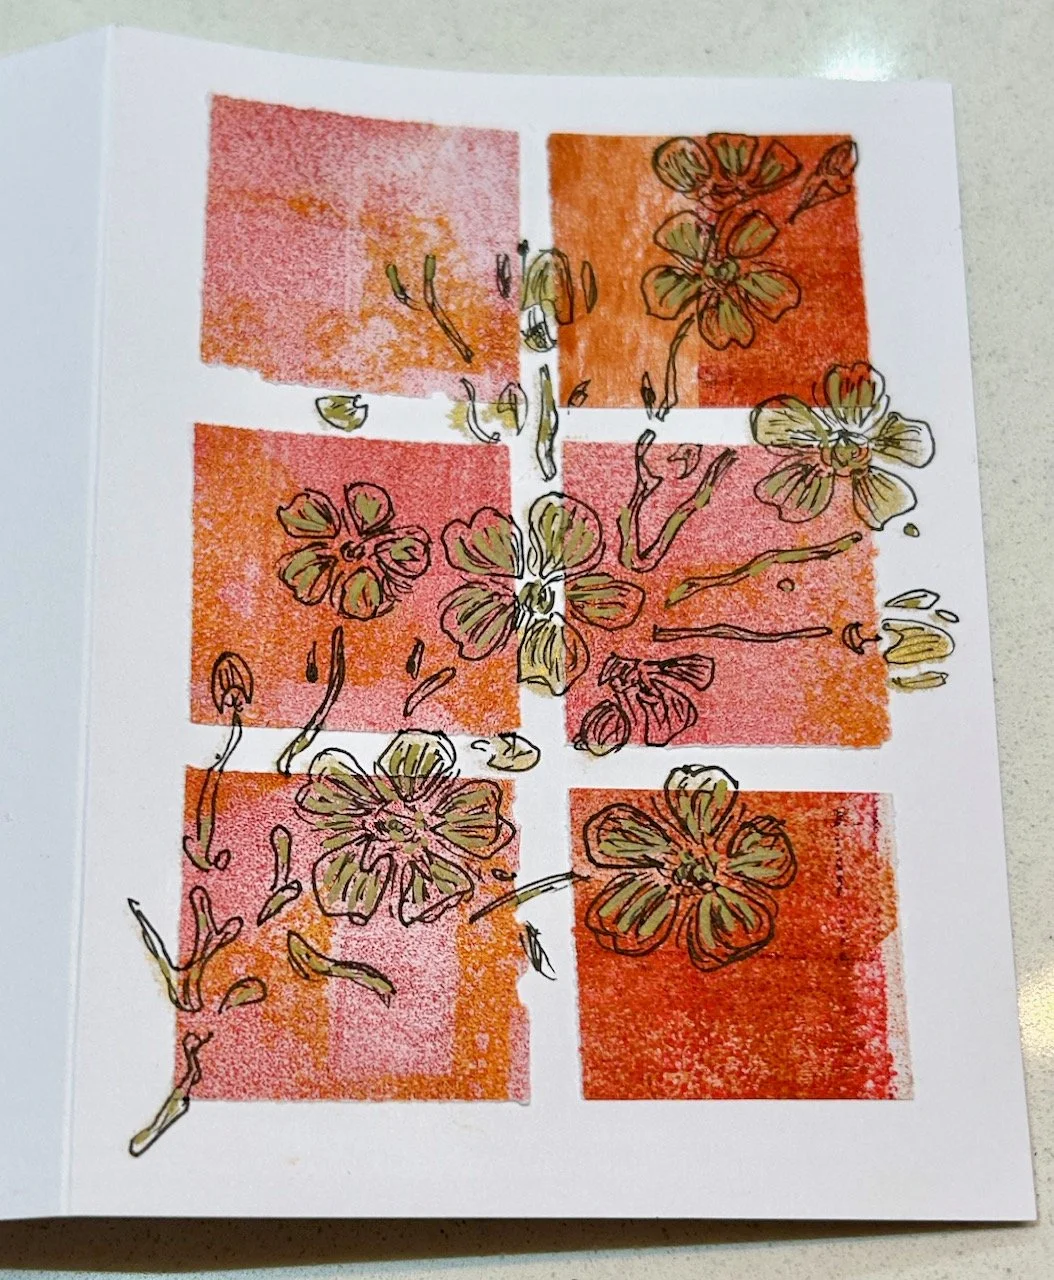
Both of these cards use the same concept but have turned out very different - and I like them both. I used a stencil for the outline of the floral and meadow designs and then adapted these, so they’re less stencil-like, using my knowledge of plants and flowers.

Six pink, white and blue gelli plate blocks arranged on a blue card with a meadow scene in black and highlights with pink and blue on top

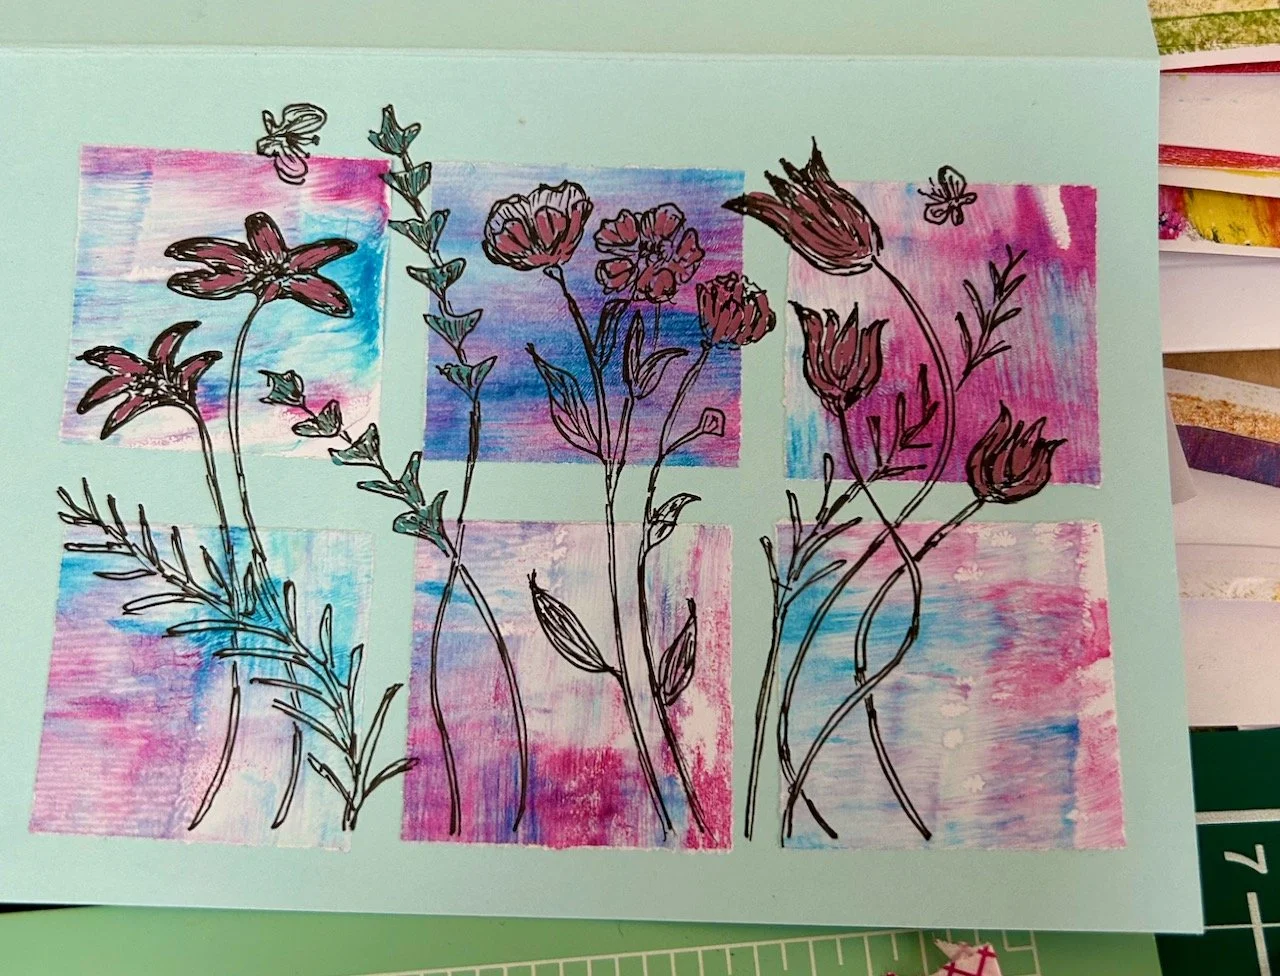
And didn’t they work out well?

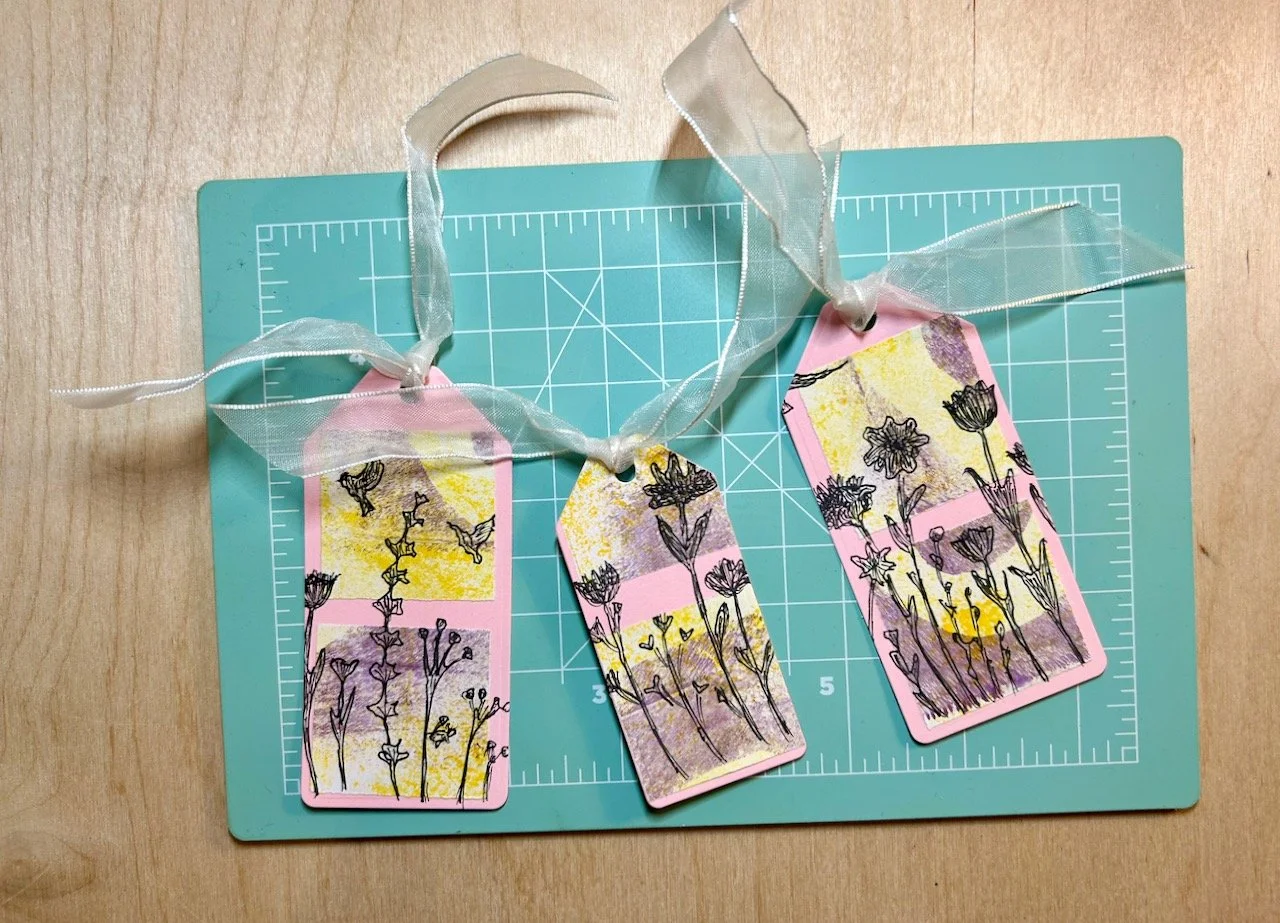
I wanted to try using some of the smaller scraps, and so that’s where gift tags came in. I think these were also successful and I used some scrap ribbon on both, and those black diagonal stripes - well they’re old dymo tape that I found in one of my many craft room boxes.

Two gift tags using scraps of gelli printing, some ribbon and washi tape (on the left hand tag) and dymo tape on the right

These three gift tags were originally intended as a card, however I realised my knowledge of birds is lacking and one (now cut out and discarded) wasn’t right at all. Not wanting to lose all of my work I repurposed these further making gift tags and adding ribbon saved from Christmas crackers many years ago as ties - and I’m not sure you’d know if I’d not told you.

A gift tag to complement the card - both use green, yellow and orange gelli printing.  The card also has scraps of ribbon and paper, a strip of map and a button

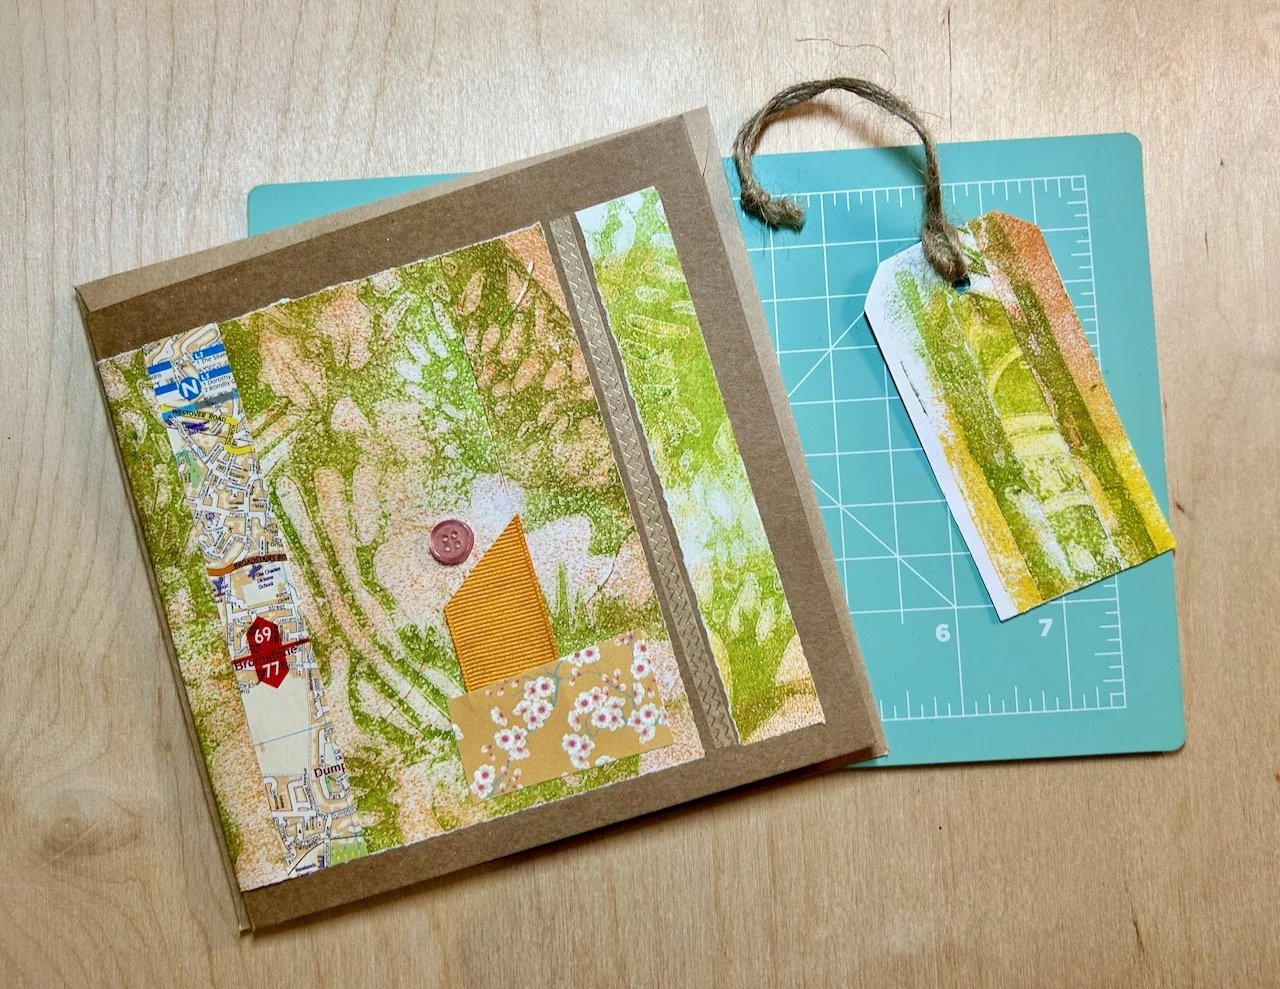
My final make was again to avoid throwing away small scraps leftover from the card - and another gift tag. I think I could quite get into having coordinating cards and gift tags, though I’m not sure anyone other than me would notice!

I just know that there’s so many more uses for all of the gelli printing I already have, let alone the ones I’ve yet to print. I’m also pretty sure that this new craft is here to stay!

PostCommentLove

The Path of Renewal

* I was invited to the press preview for and provided with a pair of tickets to Gardeners’ World Live so I’m marking posts from the show as 'Ad’ - as usual my views and opinions are very much my own. Be sure to check out all of my posts from the show.

One of my favourite show gardens was this one designed by David Negus which had the main aim of ‘challenging people’s perspectives on materials’ as well as to ‘inspire them to see the potential for reuse and repurposing by showcasing the beauty and benefits of reusing items’. The garden does indeed provide a visually stunning backdrop for the plants - as planned - but also provides spaces for wildlife too.

Scaffold planks stacked horizontally and vertically to provide structure to the edge of the seating area - the seat itself looks like an old radiator on top of scaffold poles.  Sleepers are used to frame the decking area h

For me it was this scaffold plank structure that caught my eye as a clever way of adding something that would give height and structure throughout the year. I loved the detail of turning some planks vertical provided a nook for all sorts of paraphernalia, but mostly because every garden needs somewhere to put your cuppa, doesn’t it?

I’ll admit though I was less keen about it being full of bugs and spiders, though I can see their attraction in such a space!

Wooden uprights of varying heights in the foreground, the borders and decking are behind

What this garden did help highlight for me is that gardens need height. And that doesn’t always need to come from plants. While we won’t be adding anything as near as grand as the scaffold plank shelving to our garden, I think we will be adding something with height - partly for privacy, but also for interest. These simple uprights above show it doesn’t have to be something elaborate, which is food for thought indeed.

A red workman's stop sign bottom right, the light stone path above edges the beds edged with sleepers and iron railway parts

The STOP sign made me smile, as I’m also quite partial to a sign in my garden - though my ‘pool’ sign hasn’t yet found itself a new home here, yet!

A wider angle of the same garden showing the paths, borders and decking area - with the scaffold plank structure in the background

It still blows my mind at how much is achieved by those that build these gardens in such a short space of time, and how ‘at home’ every garden looks too. And then after the show, it’s taken away again though often the gardens find new homes in alternative locations, so very little is wasted.

It’s bonkers though when you think of it like that, but I’m actually glad that it happens and that I’ve been fortunate enough to see many inspirational gardens like this one first-hand.

* With thanks to Gardeners’ World for inviting me to Gardeners’ World Live, it was as fabulous as ever!

Industrial open shelving in our pantry and utility room

Coming from a house which had neither a pantry nor a utility room it was exciting (in a domestic kind of way) to have these spaces in our new house. Both spaces had room for, and needed more storage - the pantry especially, which was essentially a large walk in cupboard. We knew soon after we viewed our new build barn that we wanted something that stood out, but was also functional too, and we quite quickly settled on the idea of pipe shelving.

I’d seen a few companies selling shelving that could work, but in the end settled on the Acumen Collection for custom-sized shelving. We also looked at buying the components separately, but decided against that because we could get what we needed for our spaces from a single supplier, which worked better for us - and it also meant that someone used to supplying these checked over our design.

As you’ll know by now I do like a plan, and this was the plan for one of the custom units we sent over for viability checking:

A handdrawn plan of the custom sized shelving unit for the back wall of the pantry

Thankfully this, and the smaller custom sized unit for the pantry came back with top marks, and it wasn’t long before we placed our order. They took a good couple of months to be made and be delivered, and when they did we were stepping over multiple boxes as we’d ordered a lot of shelves. But once they were here we were keen to get started, or rather I was keen for MOH to get started!

Since we moved in we’d used the dresser we’d had in our conservatory and a couple of bookcases as impromptu food storage, and while it worked as a temporary measure it made our kitchen diner feel more cluttered than it needed to be, and remembering exactly where I’d put things was becoming a challenge.

These are the shelves that tested the patience of a very patient MOH, and given this I was so glad we didn’t opt to source the components ourselves - though now the shelves are completed if we were to do this again, I would seriously consider doing that. But as a first-timer, probably not!

They’re heavy, and tall so had to be built in-situ - and MOH soon (mostly) got the knack of putting them together with a few swear words thrown in occasionally, as is the way with DIY.

They’re up, and they’re fantastic, and we even got them up in time for Christmas so that we could get a bit more sorted before we hosted Christmas in our new house.

A five shelf three pipe open shelving unit with scaffolding boards at the end of the room, with a smaller shelving unit at right angles on the left hand side.  An old enamel bread bin takes pride of place on the shelf, the rest of which are empty

A PLACE FOR BREAD IN THE PANTRY

And of course when they first went up it was all a bit daunting - what should go where and so on. One thing I knew was that I wanted my new-to-me enamel bread bin to have pride of place, and so that was the first thing on the shelves. Thankfully it just about fits with the lid on, and instead of bread it houses my pasta. Obviously.

Gradually the shelves started to fill up - tins below the enamelled bread bin, along with a cheese dish and a basket and tin on the shelf above

GRADUALLY FILLING UP…

A fully loaded pantry - baskets which I used in my old kitchen cupboards being reused and items we use the most within easy reach

… AND FULLY LOADED

My aim was to have a mix of practical and pretty, while having the things we used the most within easy reach - and so that meant breakfast things at eye level on the smaller unit, and interspersing the pretty items - the cheese dome, the enamelled bread bin. I reused the baskets I’d used in cupboards in our previous kitchen, hunting around the house as some had been redeployed following our move - and I think the symmetry of the baskets helps bring some order to what could be a jumble of a space.

I always planned to incorporate our old wine rack at the bottom of the unit, and this was easier said than done. The wine rack didn’t want to play ball, it wasn’t square and no matter how much MOH shaved off it still needed more. We got there in the end, but it took a while as obviously MOH didn’t want to take too much off.

At Christmas we added a small fold up table specifically for the Christmas Cake!

ADDING SOME ADDITIONAL POP UP STORAGE

It’s through using a space that you learn what works and what doesn’t. I knew that over Christmas I wanted some more surface space in here, and then I remembered my wooden fold up table which used to hold my sewing machine. That hadn’t been used since we moved and was just the right size for what I had in mind - a space for the Christmas cake!

It worked so well as a temporary solution that the table now lives in the pantry behind the door, along with the new step stool I bought so that it’s easy to reach things on the top shelf. That means I’ve needed to revise my plans for shelves behind the door, which MOH is pleased about as I now want about half the shelves I previously did!

THE NEXT SHELVING PROJECT

Here, at some point in the Year of the Shelves, I’ll have shelves from just above where the table is for spices and random cans of drinks which will tidy up this part of the pantry no end - I can’t wait - we have the wood, so I’m hopeful it won’t be too long…

A similar approach in the Utility room

We opted for the same style shelving units in the utility room to provide consistency, and because we liked them! Here though we were able to choose one of the standard sized units with six shelves. In the end we only put up five of them as while there was space I actually don’t think it needed it.

This is also fits the pretty and functional brief - and has spaces for candles, wax melts and their associated paraphernalia, batteries, our medical kit, flower arranging supplies including vases, shoe cleaning stuff, table linen, light bulbs and my lovely new(ish) preserving pan.

A five shelf 3 pipe open shelving unit in the utility room for other household items including vases, candles, tablelinen, shoe cleaning stuff, batteries and more

It holds a lot of stuff but still manages to look organised and not too arranged! And in case you’re wondering the light bulbs are in one of the large baskets on the bottom, again previously used in our old kitchen and repurposed for our new space; the batteries are in a wooden wine box next to the new medical supplies tin. And apart from that tin and the preserving pan, everything else we had in our old house, where mostly they were in cupboards either in the kitchen or elsewhere in the house.

I wasn’t sure if either space would stay so tidy, but they have - thankfully, and even more so now I’m (domestically) excited about having these spaces in our new house!

PostCommentLove